1. Support Center
  2. Installation Guides and Resources
  3. Kaiterra Square - Guides and User Manuals

Kaiterra Square Wi-Fi Pairing Guide

This guide is to walk you through the tools and steps to connect your Kaiterra Square monitor to your Wi-Fi network.

Required Tools:

  1. 100-230V AC power supply
  2. Kaiterra Square Air Quality Monitor(s)
  3. A Wi-Fi network
  4. A Wi-Fi enabled PC or Smartphone
  5. A sharp pin
  6. A cross screwdriver
  7. Electrical tape or other protection measures, such as a standard 86 box
  8. The Kaiterra Enterprise Configuration Tool

Wi-Fi Pairing Procedures:

  1. Connect the monitor to the 100-230V AC power supply and make sure the protection is sufficient against potential electrical shocks. For detailed instructions on wiring, please refer to our Wiring and Installation Guide.
  2. Make sure your computer or smartphone is connected to the Internet. Install and start the Kaiterra Enterprise Configuration Tool.
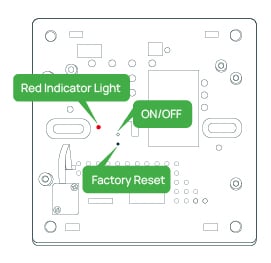
  3. Remove the front panel of your Kaiterra Square, and use the sharp pin to push the ON/OFF button, until the red indicator light blinks once.
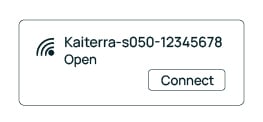
    Square wifi-1
  4. Connect your computer or smartphone to the Wi-Fi network starting with "Kaiterra" that has now appeared.
    Square wifi-2
  5. Open the Configuration Tool and click "Configure". The UDID of the device will be displayed and can be copied or saved from this page.

    Square More Details-1

    Note:

    The UDID is the unique identifier of your device, and you will need the UDID to connect your device to the Kaiterra Web App to see your data. For detailed instructions on how to connect your device to the Web App, please view our Web App Setup Guide.

  6. On the Configure tab, select your network type (DHCP or Static) and enter your network information. For example, for DHCP:
    1. Enter the SSID of the Wi-Fi network you would like to connect your monitor to.
    2. Select your network security type.
    3. Enter the correct password for your network.
      Square WiFi Settings
  7. You can also configure your Modbus address, AQI standards, and pollutants to include AQI calculation in the configuration tool:
    1. Enter a number between 1 and 247 for your Modbus address, ONLY if you would like to use Modbus for communication.
      1. Once a Modbus address is entered, you will also gain access to the Transmission (Baud) Rate and Parity Type.
      2. The Parity Type can be set to odd, even, or none from the dropdown menu. The default setting for Parity is "even". If your Modbus network does not use parity checking, select "none".

        Please consult your Modbus network admin or BMS admin to confirm the parity type of your local network. Please note that all devices in the same network should be set to the same parity type.
    1. Choose the AQI standard you would like to use for Modbus communication. Ignore this setting if you would like to use Wi-Fi only.
    2. Choose which pollutant you would like to include in the AQI calculation (for Modbus only).
      Square Modbus Settings
  1. Make sure all your information is correct, and then click “Configure device”. If the Wi-Fi pairing is successful, you will receive a notification in the window. If the pairing fails, please double-check your Internet connection and try again. You can also contact your sales representative or customer support team for help.

To learn more about how to connect your Kaiterra Square to the Kaiterra Web App and view your data, please view our Web App Setup Guide