How to use your Laser Egg with Kaiterra's Live Air app
The Kaiterra app is designed to enhance your experience with your Laser Egg by customizing settings, viewing real-time air quality readings, and accessing historical trends.
You can also set, manage, and receive notifications for when pollution levels spike. The Kaiterra app connects you to hundreds of air quality stations around the world for live pollution data.
Once your Laser Egg is connected to your app, you’ll have access to the following sections (click to jump to the section):
Overview
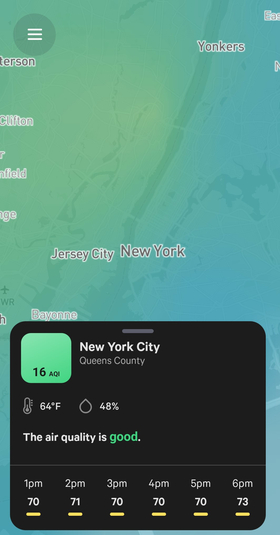
On the app's home screen, you can scroll through your saved air quality stations and find your local AQI values, no matter where you are in the world. You can also access your Laser Egg's real-time air quality readings from the home screen. Compare your indoor and outdoor air quality, and see if your pollution-fighting efforts are effective.

Notifications
Send push notifications to your Android or iOS device when something in your home or environment is polluting your air. Here’s how:
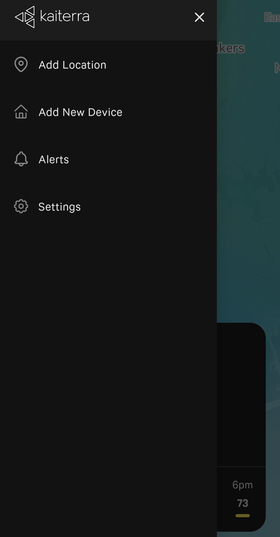
- From the app's home screen, select the menu button, then tap 'alerts'

- Select 'add alert,' then choose what device and air quality metric you would like to monitor

- Set the alert threshold using the sliding scale, then click 'save alert'
You’re all set to receive alerts when your air quality exceeds your desired threshold in your Notifications inbox. You can always edit your alerts or add new ones by accessing the menu, then selecting 'alerts.'
Note: Push notifications are available on the Kaiterra app version 2.5.1 and on.
Trends
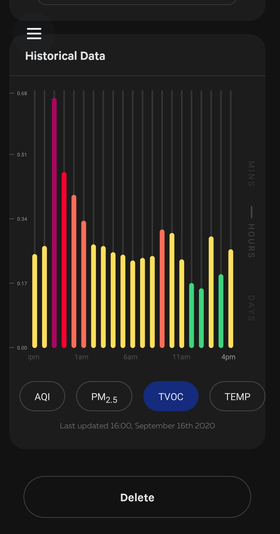
Here you can get a more detailed overview of your readings to help you better understand and analyze air quality patterns inside your home. Color-coded graphs help you understand your air quality (green for good, yellow for moderate, orange for unhealthy if sensitive, red for very unhealthy, violet for very unhealthy, and purple for hazardous).

Here you can get a more detailed overview of your readings to help you better understand and analyze air quality patterns inside your home. Color-coded graphs help you understand your air quality (green for good, yellow for moderate, orange for unhealthy if sensitive, red for very unhealthy, violet for very unhealthy, and purple for hazardous).
|
Range |
Color |
|
|
Good |
0-50 |
|
|
Moderate |
50-100 |
 |
|
Unhealthy for Sensitive Groups |
100-150 |
 |
|
Unhealthy |
150-200 |
 |
|
Very Unhealthy |
200-300 |
 |
|
Hazardous |
300-500 |
 |
Tap through each air quality parameter to review your trends by minute, hour, and day. For Laser Egg users, you can tap through AQI, PM2.5, Temperature, and Humidity. For Laser Egg+ Chemical users, you can tap through Overall Index, PM2.5, TVOC, and Temperature. You can export your data by date range in the Settings section for further analysis.
Settings
To access your settings, follow the steps below:
- Make sure your Laser Egg is connected to Wi-Fi and the Kaiterra app
- Scroll to your Laser Egg from the home screen of your Kaiterra app and swipe up
- Tap the Setting or gear button on the top right of the screen

- Adjust your settings. The changes will display on your Laser Egg within a few seconds.
Note: If your new settings don’t appear on your Laser Egg, please try restarting the device.
Once you access your settings screen, you can customize your Laser Egg to best fit your home. These include:
- Room name/location
- Display brightness
- Language
- AQI
- Temperature
- Customize Display
You can fully control your Laser Egg’s settings via your Kaiterra app, including:
- Choosing the AQI - Select your preferred AQI based on your region. US, China, and India are currently available
- Selecting your language: English, Chinese, or Polish
- Adjusting your screen's brightness - Drag the slider to the left and right
- Customizing the Display Screen - Turn on/off displays and zoomed view (for better far-sight readings)
Exporting your data
With the Kaiterra app, you can export air quality data from your Laser egg.

- Using the Kaiterra app, navigate to and select
- Tap the gear icon at the top right of the screen to enter your device’s settings
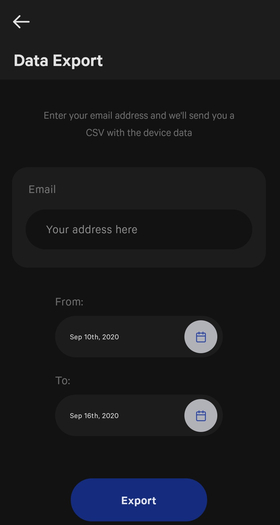
- At the bottom of the page, you will find an option for “Data Export”. Tap this and enter your email address
- Enter the date range you would like exported, then tap “Export”. You should receive an email in your inbox with your data in CSV format
