Before You Start
To set up your Laser Egg, you need to connect it to your wireless network. Before starting the setup process, make sure to check these four things:
- Connect your Android device to a nearby Wi-Fi network, not your mobile data.
Note: Make sure your Wi-Fi network is 2.4GHz. (Your Laser Egg currently does not support 5GHz networks).
- Plug the Laser Egg into a power source.
- Check that the Laser Egg is within range of your wireless network. Refer to your router’s recommended range for more details.
- Download Kaiterra's Live Air app on your Android device.
Connecting your Laser Egg to Wi-Fi
Once the Live Air app is downloaded and you’ve confirmed that your device is connected to a 2.4GHz network, follow these next steps to finish connecting your Laser Egg to Wi-Fi:
- Open the Kaiterra app
- Select the top-left button

- Select 'Add New Device' from the menu

- Select 'Laser Egg Series'

- Choose according to the logo displayed on your Laser Egg.

- Press and hold the Mode button on top of your Laser Egg for 3 seconds. A verification screen like this one below will appear:
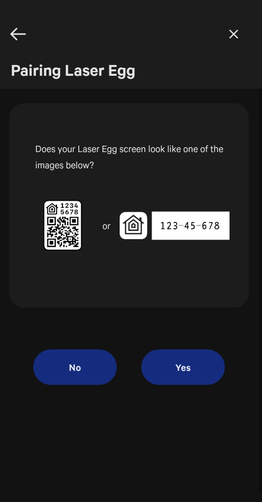
- After selecting “Yes”, please enter your Wi-Fi network’s password. This will send the password to your Laser Egg to connect.
- Tap ‘Wi-Fi Settings’. After you successfully connect to the Wi-Fi network, you will see a list of available Wi-Fi networks to choose from. Find your Laser Egg in the dropdown (it may take several seconds for it to appear):
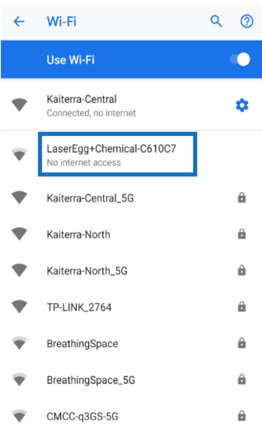
Note: When you connect to the Laser Egg’s network, you might need to wait 10-15 seconds to ensure that the connection is complete. Also, your device may tell you that the Laser Egg network is not recommended because it has no internet access. Ignore this message and continue with the setup.
- The app will then prompt you to return to your original Wi-Fi by opening your Wi-Fi settings and reconnecting.
Your setup is complete!
Troubleshooting
If you experience any trouble connecting your Laser Egg to Wi-Fi from your Android device, try the troubleshooting techniques listed below:
Things to Double-Check
- Check that your Laser Egg is within range of your wireless network. If the signal strength isn’t strong enough because you’re too far away, try moving closer to the router.
- Check the Wi-Fi signal strength on your Android device.
- Check that your device is not using a 5GHz network. The Laser Egg won't sync to a 5GHz wireless network.
- Make sure that your router isn't set to WPA3. If it is, please disable WPA3 and use WPA2.
- Check that other devices nearby are able to connect to your wireless network (to confirm that you have a strong internet connection).
- Check that you’ve entered your wireless network password correctly.
- Check that your Live Air app is updated to the latest version available.
Restart Your Android Device
If you’ve gone through all of the steps and can’t connect your Laser Egg to Wi-Fi, try restarting your Android device and connect it again.
If you're still unable to connect your Laser Egg, get in touch with us at support@kaiterra.com. We'll help you find a solution.