Timestamps:
0:00 - Introduction
0:20 - What comes with your Sensedge Mini (All the components)
0:48 - Device Overview (Air Vents, Power, and Connectivity Options)
1:44 - Inside the Sensedge Mini (Power, Reset, Status Lights, and Module Bays)
2:56 - The Sensor Modules (What they are, How to insert)
4:23 - Closing the device
Below is a text version of the video above! This is for those that prefer a laid-out text walkthrough or would like some clarity on some of the points made throughout the video.
Receiving a brand new device is exciting! But it can also be intimidating - which is why this walkthrough will show you all of the different parts of your Sensedge Mini and how they function.
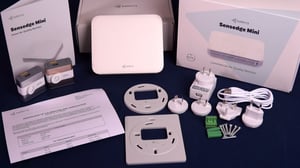
We start by quickly going over what comes with your device. It's important to familiarize yourself with all of the different possibilities for mounting and securing your device!
Next, we go over the device's air vents, power, and connectivity options.
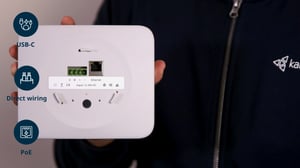
For power, the Sensedge Mini can use either USB-C or DC Direct Wiring - with Power over Ethernet (PoE) as an option for the PoE version of the device (SE-200P).
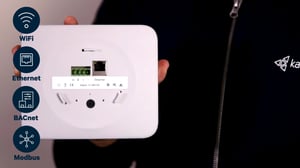
As for connectivity, your options are 2.4GHz WiFi, Ethernet, Modbus (via RS-485), and BACnet/IP.
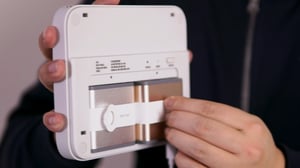
Afterward, we look at the inside of the Sensedge Mini and the various buttons and indicators it comes equipped with.

Power Button: Used to power the device on and off
Reset Pinhole: Used to reset your device to factory settings
Device Status Light: Used to indicate if your device is working correctly
If the Device Status Light is:
- Off = Device is working properly
- Flashing Yellow = Device is in Configuration Mode
- Glowing Green (slowly) = Device is attempting to connect to a network
- Flashing Red = No network connection
- Steady Red = Device failure
Sensor Status Lights: Used to indicate if your Sensor Modules are working correctly
If the Sensor Status Light is:
- Off = Sensor module is working properly
- Flash Once = Sensor module is powered on
When the device is turned on or the sensor is pressed in - Flash Repeatedly = Sensor module failure
Try re-seating the sensor module into the sensor bay and check the pin connectors for any damage - contact us if the problems persist! - Constantly On = Sensor module needs to be changed
Sensor Module Bays: Used to secure your Sensor Modules in place
Then we look at the Sensor Modules of the Sensedge Mini
The standard Sensedge Mini comes with the KM-200 and KM-203

The KM-200 is the silver sensor module that measures your Particulate Matter - PM2.5

The KM-203 is the gold sensor module that measures your Total Volatile Organic Compounds (TVOC) - this sensor requires a brief warm-up period, so make sure it is exposed to clean, fresh air during the start-up!
By using a modular design, the Sensedge Mini allows you to replace our sensor modules when needed, without having to go through the traditional (and painful) calibration process.
We recommend changing your sensor modules every 1.5 years to main accurate readings
WELL, RESET, and other building certifications typically require annual replacement or calibration - so make sure to check out their requirements for more information!
 To insert a sensor module, all you have to do is align it with the sensor module bay and press it in - making sure the Kaiterra Logo is facing outwards and the pin connectors are along the top. If inserted correctly, the module will click into place - and the sensor status light will flash once.
To remove a sensor module, grip onto the module tab and pull directly away from the device.
Keep in mind the following:
- Sensor modules can be inserted and removed, whether the device is on or off
- Sensor modules can be placed in any order
- Sensor modules can be placed in either sensor module bay
So you don't have to worry about which sensor goes in which bay, nor do you have to turn the device off when replacing or re-seating your sensor modules.

And that's it! Once your modules are inserted and your device is turned on, you can proceed with the configuration of your device to make sure it is properly connected to the network!
Just remember to place the front panel back onto the device - it really completes the look!