Timestamps:
0:00 - Introduction
0:20 - The modular design
0:47 - The Sensor Modules: KM-200 and KM-203
1:18 - The Other Sensors: CO2, Temperature, and Relative Humidity
1:42 - How to Insert and Remove your Sensor Modules
2:45 - Closing the device
Below is a text version of the video above! This is for those that prefer a laid-out text walkthrough or would like some clarity on some of the points made throughout the video.

The modular design of the Sensedge Mini allows you to replace our sensor modules when needed, without having to go through the traditional (and painful) calibration process.
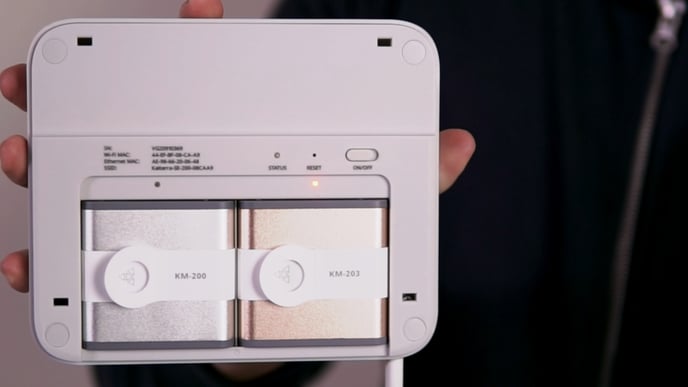
The standard Sensedge Mini comes with two sensor modules:
the KM-200 and the KM-203.

The KM-200 is the silver sensor module that measures your Particulate Matter - PM2.5

The KM-203 is the gold sensor module that measures your Total Volatile Organic Compounds (TVOC) - this sensor requires a brief warm-up period, so make sure it is exposed to clean, fresh air during the start-up!
We recommend changing your sensor modules every 1.5 years to main accurate readings
WELL, RESET, and other building certifications typically require annual replacement or calibration - so make sure to check out their requirements for more information!
The CO2, Temperature, and Relative Humidity sensors are built directly into the device.
- The CO2 sensor uses an Automatic Baseline Correction, which allows it to self-correct its readings over time, ensuring its accuracy.
- The Temperature and Relative Humidity sensors do not require regular maintenance and can maintain accurate readings for many, many years
 To insert a sensor module, all you have to do is align it with the sensor module bay and press it in - making sure the Kaiterra Logo is facing outwards and the pin connectors are along the top. If inserted correctly, the module will click into place - and the sensor status light will flash once.
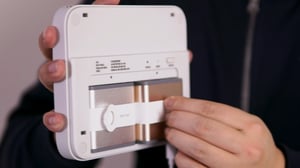
To remove a sensor module, grip onto the module tab and pull directly away from the device.
Keep in mind the following:
- Sensor modules can be inserted and removed, whether the device is on or off
- Sensor modules can be placed in any order
- Sensor modules can be placed in either sensor module bay
So you don't have to worry about which sensor goes in which bay, nor do you have to turn the device off when replacing or re-seating your sensor modules.
The Sensor Status Lights will indicate if your sensor modules are working properly
If the Sensor Status Light is:
- Off = Sensor module is working properly
- Flash Once = Sensor module is powered on
When the device is turned on or the sensor is pressed in - Flash Repeatedly = Sensor module failure
Try re-seating the sensor module into the sensor bay and check the pin connectors for any damage - contact us if the problems persist! - Constantly On = Sensor module needs to be changed

And that's it! Once your modules are inserted and your device is turned on, you can proceed with the configuration of your device to make sure it is properly connected to the network!
Just remember to place the front panel back onto the device - it really completes the look!